

The Problem: Why Your Lead Turns to Mud an Octave Down
You build a supersaw lead that sits perfectly in the top of the mix. You drop the MIDI an octave for the breakdown, and the thing falls apart — dull, smeared, wide in all the wrong places. Nothing in the patch changed, so the obvious conclusion is that the synth sounds bad down there. That conclusion is wrong.
When you transpose, the oscillators scale. Everything downstream does not. Filter cutoff, EQ bands, saturation thresholds, chorus and unison detune, reverb pre-delay — all of them stay parked at the same absolute frequencies and the same absolute times. The skeleton of the sound moves; the clothes stay where they were. What breaks is not the oscillator. It’s the environment you built around the oscillator.
What Scales With Pitch and What Stays Fixed
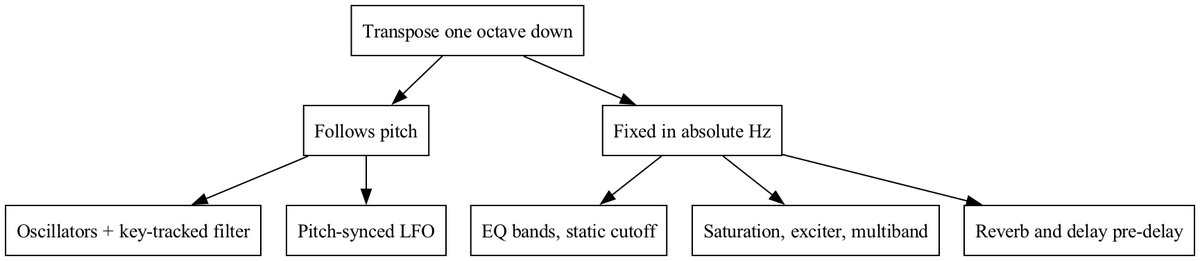
Split your signal chain into two buckets.
Follows pitch: oscillator frequency, any filter with keyboard tracking enabled, LFOs set to pitch-sync or key-follow modulation. These move with the note and keep their relationship to the harmonic series intact.
Fixed in absolute Hz: EQ bands, a static filter cutoff with tracking at zero, the harmonic threshold of a saturator, exciter bands, multiband compressor crossover points, reverb and delay pre-delay times.
Here’s the concrete consequence. Play A4 at 440 Hz and a presence EQ boost at 3 kHz lands just above the sixth harmonic — close to the body of the sound. Drop an octave to 220 Hz and the whole harmonic series halves. That same 3 kHz boost now sits above the thirteenth harmonic, in a region where the supersaw has thin, noisy detune artifacts instead of musical content. You didn’t boost presence anymore. You boosted hash.
The saturator deserves special attention. Distortion generates harmonics as multiples of the input frequency, so the generated content does move with the note — but the input level hitting the saturator changes too, because a lower fundamental carries different energy through a fixed filter. Same drive knob, different distortion character.
Why Unison Detune Breaks When You Change Octave
Supersaw character comes from detune measured in cents. What your ear actually hears is beating, measured in Hz. Those two units do not scale together.
Twenty cents of detune at 880 Hz produces roughly 10 Hz of beating — fast, shimmering, aggressive. The same 20 cents at 110 Hz produces about 1.3 Hz of beating — a slow wobble that reads as tuning drift rather than thickness. Identical patch, identical detune parameter, completely different musical result.
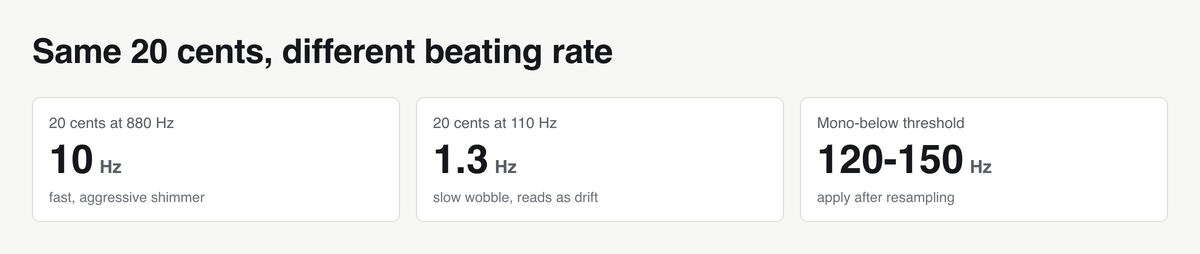
The fix is directional and it is not subtle: when you move a patch down an octave, increase the detune amount; when you move it up, decrease it. If you want the same perceived beating rate an octave lower, you need roughly double the cents. Most unison engines will go sour long before that, which is exactly why the “just transpose the MIDI” approach has a ceiling.
What Must Collapse to Mono in the Lower Octave
Unison spread, chorus, and stereo wideners all work by introducing phase and time differences between channels. Above a few hundred Hz that reads as width. Below roughly 200 Hz it reads as cancellation — and on a club system summing to mono, as disappearance.
A lead patch at 440 Hz with full unison spread is fine. The same patch at 110 Hz is now occupying bass territory with a stereo image that will partially cancel. If you move a lead down into the bass register and leave the width settings untouched, mono compatibility dies quietly — it still sounds good in your headphones, which is the worst kind of problem.
The fix is a utility that monos everything below 120–150 Hz, or a width element tied to frequency. The important part is when you apply it: after the resample, on the pitched audio, not inside the synth patch before transposing. Applied before, it operates on the original frequency range and does nothing useful once the sound moves.
The Right Order: Resample First, Then Pitch
Design the sound at the octave where it already works. Bounce it to audio with the full effect chain committed. Then pitch the audio.
Now everything moves together. The harmonics the saturator generated, the resonant peak the filter carved, the EQ boost you dialed in — all of it is baked into the waveform, and shifting the waveform shifts all of it by the same ratio. The relationships you spent an hour balancing survive the transposition.
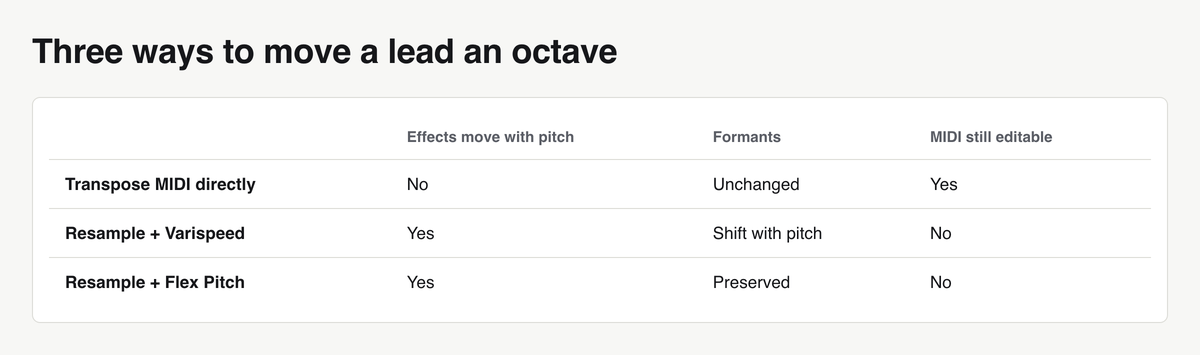
Formant shift is the side effect people warn about. In electronic music it’s usually the feature. A supersaw pitched down tape-style gets a heavier, chunkier character that a formant-preserving algorithm will specifically remove. That’s a creative choice, not a mistake — which is why Logic’s two tools behave differently and you need to pick deliberately.
Step-by-Step Resample Workflow in Logic Pro
A typical pass looks like this:
- Get the patch and its channel strip into final shape at the original octave.
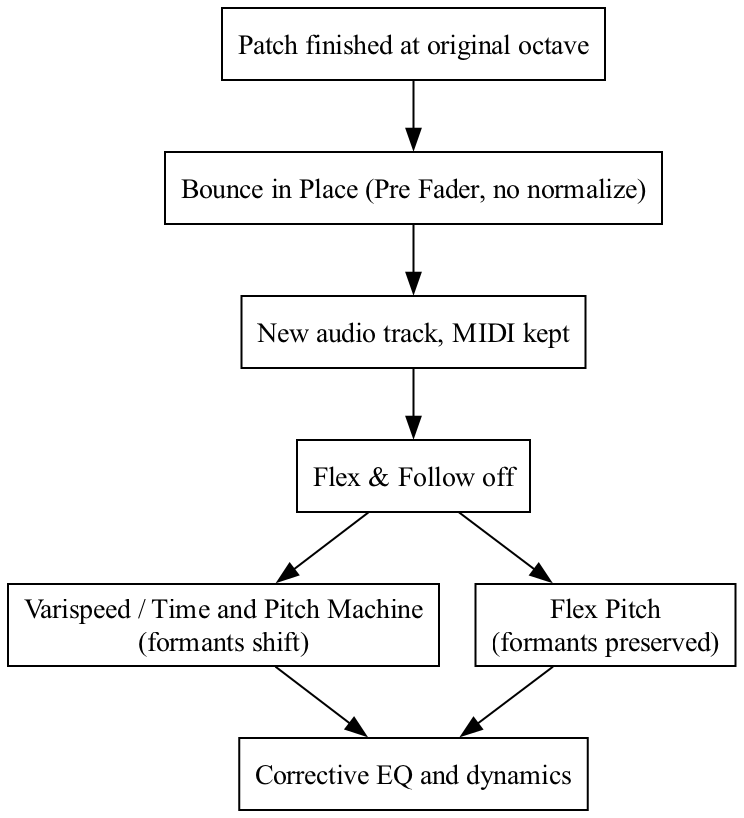
- Select the region, Bounce in Place. Set Source to Pre Fader so the chain is captured at unity and the fader remains a mix control. Turn Normalize off — normalizing destroys the level relationship to the rest of the arrangement.
- Send the result to a new audio track rather than replacing the instrument track, so the MIDI stays available.
- On the new region, turn Flex & Follow off in the region inspector. Left on, the region will stretch with tempo changes and you’ll chase artifacts that have nothing to do with pitch.
- Shift the pitch with one of the two tools below.
- Re-balance the chain on the new audio track.
For the shift itself: Flex Pitch preserves formants and leaves project playback untouched — use it when you want the same timbre at a new pitch. Varispeed is tape-style: pitch and speed move together and formants shift with them. It’s a project-wide setting, so committing it means bouncing while it’s active. For a single file, the Time and Pitch Machine in the File Editor gives the same tape behavior without touching the rest of the project.
When You Should Not Resample
Committing to audio costs you flexibility, and that cost is real. Skip the resample when:
- The melody isn’t final. Re-bouncing after every note change burns more time than it saves.
- The arrangement isn’t locked. Tempo changes against non-flexed audio mean doing the whole pass again.
- You reuse the patch as MIDI across multiple sections or tracks.
In those cases, fix the problem inside the instrument instead. Enable keyboard tracking on the filter so cutoff follows the note. Keep tone shaping inside the synth — ES2 and Alchemy both expose key-follow as a modulation source, so you can route note number to cutoff, drive, or detune amount directly. A channel-strip EQ cannot follow pitch; a key-follow modulation inside the instrument can. Building these routings into your instrument presets once pays off every time you reach for them, which is the same argument for keeping a prepared Logic Pro trance template.
Fitting the Resampled Layer Into the Mix
The pitched file has a new gain and a new tonal balance. Treat it as a new sound, not as the old one relocated.
Pitched down: energy piles into 100–300 Hz and the attack softens because the transient’s high-frequency content moved down with everything else. Cut narrowly where it collides with the bass, and use a transient shaper to get the attack back — a lead that’s lost its edge in the lower octave usually needs attack restored before it needs more EQ.
Pitched up: the top end fills in, the sound stops fighting the kick and starts fighting hi-hats and open percussion. A dynamic cut in the 6–10 kHz region — de-esser style, triggered rather than static — keeps it from turning harsh without dulling the sustain.
In both directions, apply the mono-below-150 Hz utility here, on the pitched audio, where it finally has something to act on.
What to Do Next
Pick one supersaw patch. Render the same MIDI three ways: transposed directly in the instrument, resampled then varispeed, resampled then Flex Pitch. Line them up on three tracks and A/B them at matched loudness. The differences between the three are far larger than most producers expect, and hearing them once settles which tool belongs in which situation better than any rule you can read.
Then add a dedicated resample bus to your template — an audio track with input set to the relevant bus and the mono-below utility already in the chain — so this workflow is one click away in every project instead of a ten-minute detour.